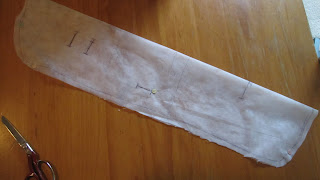
As promised here is a new How To on drafting a pram liner pattern and sewing the liner. I have used a Maclaren Quest for this, but made liners for lots of different prams in this way. My previously posted Mountain Buggy & Baby Jogger City Mini liners are made in this same way.
Materials
.5 meter Easy Trace or Kwik Trace (available from Spotlight)
a ball point pen
.5 meter of fabric for each side.*
.4 meter of 1cm thick foam (available from Clark Rubber)
* if you choose a pattern which is one directional you may need to increase this accordingly.
It is usually much easier to get a good fit for your liner by removing the seat of the pram, (this also gives you a great opportunity to give it a good wash. ) Once off lay it out as flat as possible, fold any folds outwards. Lay the Easy trace over and pin it down, by pushing pins into the seams, this will avoid doing any damage to your pram fabrics.
Then using a ball point pen (which won't bleed through) trace the seam lines, buttonholes for straps and any important folds, by top stitching them on your liner will seat much neater. Be sure to minimize movement so it is as even as possible.
When complete put your pram fabrics aside, neaten the lines and add a 15mm selvage around the edge.
Once you've traced the seat it is time to neaten it all up. It is important that it is symmetrical and that it matches the seat. Fold it in half (and hopefully!) it should be close.
Clean up the lines, straightening them, adjust the button holes etc. Referring back to the seat as much as needed. When it's done cut out your pattern and your ready to sew!
Cut the foam and each fabric piece out. Take care that the fabric is in the right direction.

Lay the foam on the bottom and both pieces of fabric right sides together on top.
Sew around the edges leaving a 5" gap, ideally at the top as this section is usually covered by the hood.
Turn the liner the right way again, check the edge seams to make sure they are neat and even. Press.
Hand stitch close the opening.
Sew around the liner 5mm from the edge to give a neat look and structure.
Refer back to your pattern and mark the button holes and fold lines for the seat back etc with pins.
Before you sew anything be sure to use a ruler to check they are evenly spaced, or the liner will slant and also hold it against the (reassembled) pram to make sure the holes will line up.
Then sew your buttonholes and top stictching.
And Voila!!! You are done!


6 comments:
Hi - Just wanted to say thanks for the instructions on drafting a pattern. Just finished making a pram liner for my mountain buggy. It worked out pretty well - although some of my strap holes are a little wonky but not bad enough to notice.
Cheers,
Yen
Thank you so much for the instructions! I'm a sewing beginner but will def be attempting thing!
Thanks for providing such informative post regarding drafting of pram liners. Your tips makie it easier and affordable and these pram liners can be washed easily at the home.
pram liners
Great tutorial you have provide here regarding drafting of pram liner. This instruction is very useful for mother who want to make it at home. Home made pram liner is best to use that inexpensive and also good for machine wash.
silver cross
Nice Information !
You may like Baby strollers for your kids....
This is the precise blog for anyone who needs to seek out out about this topic. You notice a lot its almost onerous to argue with you (not that I truly would want…HaHa). You definitely put a brand new spin on a topic thats been written about for years. Nice stuff, just nice! online casinos
Post a Comment